CSSの:has()疑似クラスの使い方
- #CSS
はじめに
今回は各ブラウザにサポートされたCSSの:has()疑似クラスについて解説をしていきます。
:has()とは?
:has()疑似クラスとは、セレクタ内に指定した要素が存在する場合にのみスタイルを適用するCSSの新機能です。
構文
親要素:has(子要素) {
  /* スタイル宣言 */
}
https://developer.mozilla.org/ja/docs/Web/CSS/:has https://caniuse.com/css-has
これまでのCSSでは、要素の存在によって親や特定の要素にスタイルを当てることができず、 以下のように、あり・なし用のクラスを用意して切り替える必要などがありました。
<!-- 画像あり -->
<div class="card card--image">
  <div>
    <img src="sample.jpg" alt="">
  </div>
  <div>
    <p>テキスト</p>
  </div>
</div>
<!-- 画像なし -->
<div class="card">
  <div>
    <p>テキスト</p>
  </div>
</div>
使用例
特定の要素があるかどうかを判別してスタイルを適用する
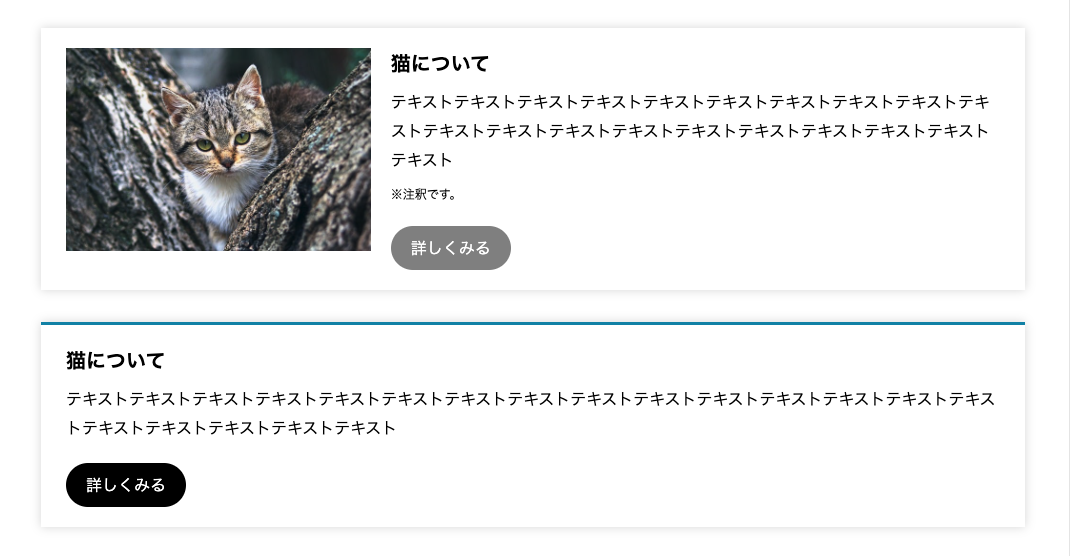
以下の例は、:has()を使用して、画像のあり・なしによってスタイルを変更しています。
<div class="has-box__item mt-10">
            <figure class="has-box__figure">
              <img src="images/cat.jpg" alt="">
            </figure>
            <div class="has-box__block">
              <h3 class="has-box__title">猫について</h3>
              <p class="has-box__text">テキストテキストテキストテキストテキストテキストテキストテキストテキストテキストテキストテキストテキスト</p>
              <p class="has-box__annotation">※注釈です。</p>
              <div class="mt-20">
                <a class="has-box__button" href="" target="_blank">詳しくみる</a>
              </div>
            </div>
          </div>
画像がある場合は横並びにする
.has-box__item:has(.has-box__figure) で子要素に画像が含まれている場合のスタイルを当てています。 画像が含まれていない場合は、.has-box__itemに設定しているスタイルが適用されます。
.has-box__item {
  gap: 20px;
  box-shadow: 0px 0px 10px 0px rgba(51, 51, 51, 0.2);
  padding: 20px 25px;
  border-top: 3px solid #088cb1;
}

.has-box__item:has(.has-box__figure) {
  display: grid;
  grid-template-columns: 1fr 2fr;
  border-top: none;
}
ボタンにリンク先が設定されていない場合は非活性にする
.has-box__item:has(.has-box__button[href=""]) .has-box__button{
  opacity: 0.5;
  pointer-events: none;
}
説明文の要素に注釈が隣接していた場合は余白をつける
.has-box__text:has(+ .has-box__annotation) {
  margin-bottom: 10px;
}
:has()を使ったフォームの変更
以下は、フォームの入力内容によって要素の表示・非表示を行う例です。 今までは実装するためにJavaScriptなどで対応していましたが、CSSのみで実装することが可能になりました。
チェックボックスにチェックが入っている場合は、リセットボタンを表示
<form action="" class="form mt-10">
        <ul class="category-list">
          <li class="category-list__item">
            <label>
              <input type="checkbox">
              <span>カテゴリー1</span>
            </label>
          </li>
          <li class="category-list__item">
            <label>
              <input type="checkbox">
              <span>カテゴリー2</span>
            </label>
          </li>
          <li class="category-list__item">
            <label>
              <input type="checkbox">
              <span>カテゴリー3</span>
            </label>
          </li>
        </ul>
        <button class="category-reset mt-20">リセット</button>
      </form>
.form:has(input:checked) .category-resetによって、非表示にしていたリセットボタンを、 inputがcheckedになっている場合のみ表示させています。
.category-reset {
  display: none;
  background-color: #fb1616;
  border: none;
  padding: 10px 24px;
  height: 40px;
  color: #fff;
  font-weight: bold;
}

.form:has(input:checked) .category-reset {
  display: block;
}
その他お問い合わせを選択した場合のみテキストエリアを表示する
<form action="" class="form mt-10">
        <div class="select-box">
          <select name="">
            <option value="" selected="selected">
              選択してください。 </option>
            <option value="new-graduate">
              新卒採用に関するお問い合わせ </option>
            <option value="mid-career">
              中途採用に関するお問い合わせ </option>
            <option value="other">
              その他お問い合わせ</option>
          </select>
        </div>
        <div class="other-field mt-20">
          <p>お問い合わせ内容を入力してください。</p>
          <textarea name="" class="mt-10"></textarea>
        </div>
      </form>
.form:has(option[value="other"]:checked) .other-fieldによって、非表示にしていたテキストエリアを、その他お問い合わせの場合のみ表示させています。
.other-field textarea{
  width: 100%;
  max-width: 300px;
  height: 80px;
  resize: none;
}

.form:has(option[value="other"]:checked) .other-field {
  display: block;
}
まとめ
:has()を使用することによってコードの管理がしやすくなり、運用面でも柔軟性が向上したと思いました。 今回紹介した以外にも応用次第で様々な実装が可能です。 各ブラウザにサポートされたCSSの新機能は他にもあるので、 使用方法を確認し、より効率的で保守性の高いコードを書けるようにしていきたいです。