Panda CSSの基本的な使い方と導入手順
- #CSS,
- #TypeScript,
- #React
今回はCSSフレームワーク「Panda CSS」を紹介します。 この記事ではPanda CSSの利点や基本的な使い方について整理していきます。
Panda CSSとは
Panda CSSは、Chakra UIチームが開発した新しいCSSフレームワークです。 特徴は「ゼロランタイムCSS-in-JS」で、パフォーマンスや型安全性を重視しています。
Panda CSSの特徴
- ゼロランタイム:静的なCSSをビルド時に生成し、ランタイムのオーバーヘッドを削減。
- 型安全:TypeScriptを活用した補完機能で効率的にコーディング可能。
- 軽量: アトミックCSSで重複のない最小限のCSSを生成。
- 最新機能対応: @layerや:whereなど、最新のCSS仕様に対応。
なぜPanda CSSを選ぶのか?
ドキュメントのThe Motivationを確認したところ、
近年、React Server Componentsやサーバーファーストのフレームワークが増えているなかで、 emotion、styled-componentsなどの、ランタイムCSS-in-JSではパフォーマンスや互換性の課題が増えてきていることで、Panda CSSはそれらの課題を解決するために誕生したようです。
インストールと初期設定
必要なパッケージのインストール
以下のコマンドを実行して、Next.jsプロジェクトを作成し、Panda CSSを導入します。
- プロジェクトを作成します。
npx create-next-app@latest --use-npm- 必要なパッケージをインストールします。
npm install -D @pandacss/dev
npx panda init --postcss
設定ファイルの編集
panda.config.tsが生成されるので、以下のように設定します。
include: [
    "./src/components/**/*.{ts,tsx,js,jsx}",
    "./src/app/**/*.{ts,tsx,js,jsx}",
  ],
次に、package.jsonに以下のスクリプトを追加します。
これによって、npm install時などに実行されstyled-systemが生成されます。
 "scripts": {
    "prepare": "panda codegen",
    "dev": "next dev",
    "build": "next build",
    "start": "next start",
    "lint": "next lint"
  },
スタイルの適用方法
以下のように、cssメソッドを使って簡単にスタイルを適用できます。
src/app/page.tsximport { css } from "../../styled-system/css";
export default function Home() {
return (
<div className={css({ fontSize: "2xl", fontWeight: "bold" })}>
Hello 🐼!
</div>
);
}
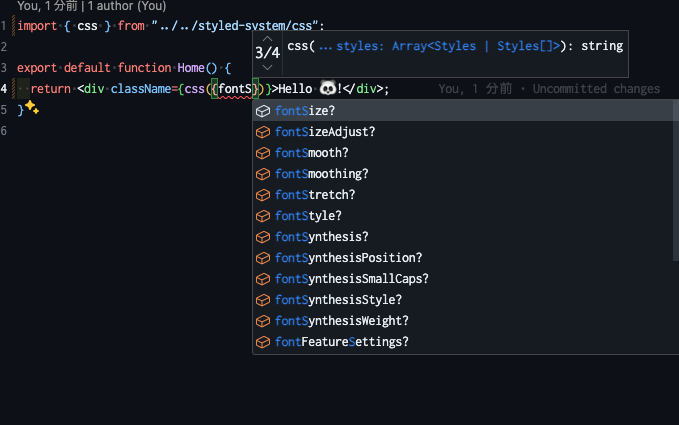
@layer reset, base, tokens, recipes, utilities;VSCodeでの補完
VSCode上でCSSプロパティの補完も効きますので、開発効率を上げることができそうです。
開発サーバーを起動して、スタイルが適用されていることを確認します。
npm run devここまでで、以下のような画面に🐼が表示されていればPanda CSSを使う準備は完了です。

生成されたCSSは.next/static/css内に生成されます。
dev環境で.nextがキャッシュされる可能性があるので以下に変更
 "scripts": {
    "prepare": "panda codegen",
    "dev": "rm - rf .next && next dev", // 変更
    "build": "next build",
    "start": "next start",
    "lint": "next lint"
  },
自動補完が効かない場合は以下をtsconfig.jsonに設定
{
  "include":  ["src", "styled-system"]
}
panda.configでの設定時にes5で動かない構文を使用したときに動かない場合があるので、tsconfig.jsonに以下を設定
{
  "compilerOptions": {
    "target": "es6",
  }
}
主な機能の解説
1. Cascade Layers
Panda CSSではCSSの優先順位を「カスケードレイヤー」で管理します。 例えば、utilitiesレイヤーに記述したスタイルは、resetやbaseより優先されます。
- @layer reset リセットCSS
- @layer base グローバルCSS
- @layer tokens デザイントークンとして定義したCSS変数
- @layer recipes Recipesで定義した値
- @layer utilities 特定のユーティリティスタイル。
@layer reset, base, tokens, recipes, utilities;2. グローバルスタイル
グローバルスタイルを設定して適用することができます。
スタイルは、@layer Baseに追加されます。
panda.config.tsimport { defineConfig, defineGlobalStyles } from "@pandacss/dev";
// 追加
const globalCss = defineGlobalStyles({
"html, body": {
color: "gray.900",
lineHeight: "1.5",
backgroundColor: "red.200",
},
});
export default defineConfig({
// Whether to use css reset
preflight: true,
globalCss,// 追加
// Where to look for your css declarations
include: [
"./src/components/**/*.{ts,tsx,js,jsx}",
"./src/app/**/*.{ts,tsx,js,jsx}",
],
// Files to exclude
exclude: [],
// Useful for theme customization
theme: {
extend: {},
},
// The output directory for your css system
outdir: "styled-system",
});
3.ネスト構文
以下のように、CSSネスト構文を利用できます。
&と_の両方に対応しているため、柔軟に記述することが可能です。
<div
  className={css({
    bg: 'red.400',
    '&:hover': {
      bg: 'orange.400'
    }
  })}
/>

<div
  className={css({
    bg: 'red.400',
    _hover: {
      bg: 'orange.400'
    }
  })}
/>
4. Conditional Styles(条件付きスタイル)
状態に応じたスタイルも簡単に適用することができます。
<button
  className={css({
   bg: { base: 'red.500', _hover: 'red.700' } // hover時のスタイルをred.700
  })}
>
  Hover me
</button>

<button
  className={css({
    bg: { base: 'red.500', _hover: { _focus: 'red.700' } } // hoverかつfocusされた状態
  })}
>
  Hover me
</button>
5. Classname concatenation
スタイルをマージすることが可能です。
親からスタイルを決めたいときに便利そうだと思いました。
import { css, cx } from '../styled-system/css'

const styles = css({
  borderWidth: '1px',
  borderRadius: '8px',
  paddingX: '12px',
  paddingY: '24px'
})

const Card = ({ className, ...props }) => {
  const rootClassName = cx('group', styles, className)
  return <div className={rootClassName} {...props} />
}
6. Hashing
panda.config.tsにhash: trueを追加することによってクラス名をハッシュ化することが可能です。
クラス名が短い方がファイルサイズ削減にはなりますが、デバッグ時には人間が読めるクラス名の方が便利なため、開発時と本番環境で設定を切り替えるといいと思いました。
import { defineConfig } from '@pandacss/dev'

export default defineConfig({
  // ...
  hash: true
})

7. Display Property
特定のブレークポイントのみを指定してスタイルを適用することも可能です。
これだけで対応できるのはすごく楽だなと思いました。
<div className={css({ display: 'flex', hideFrom: 'md' })} /> // mdのみ除外
<div className={css({ display: 'flex', hideBelow: 'md' })} /> // mdのみ適用
8.Responsive Design
ブレイクポイントを設定し、レスポンシブスタイルを指定できます。
panda.config.tstheme: {
extend: {
breakpoints: {
sm: "640px",
md: "768px",
lg: "1024px",
xl: "1280px",
"2xl": "1536px",
},
},
}<span
className={css({
fontWeight: 'medium',
lg: { fontWeight: 'bold' }
})}
>
Text
</span>ブレイクポイントの範囲指定
<span
  className={css({
    fontWeight: { mdToXl: 'bold' }
  })}
>
  Text
</span>
単一のブレークポイントのみの場合
<span
  className={css({
    fontWeight: { lgOnly: 'bold' }
  })}
>
  Text
</span>9.Style props
スタイルをPropsで渡すことができる
panda.config.tsimport { defineConfig, defineGlobalStyles } from "@pandacss/dev";
outdir: "styled-system",
jsxFramework: "react", // 追加
});
import { css } from '../styled-system/css'
import { styled } from '../styled-system/jsx'

// The className approach
const Button = ({ children }) => (
  <button
    className={css({
      bg: 'blue.500',
      color: 'white',
      py: '2',
      px: '4',
      rounded: 'md'
    })}
  >
    {children}
  </button>
)

// The style props approach
const Button = ({ children }) => (
  <styled.button bg="blue.500" color="white" py="2" px="4" rounded="md">
    {children}
  </styled.button>
)
最後に以下のコマンドを実行して使用できるようになります。
npm panda codegen --clean10.Factory Function
コンポーネントライブラリにPanda CSSのスタイルを適用することができる
import { styled } from '../styled-system/jsx'
import { Button } from 'component-library'

const StyledButton = styled(Button)

const App = () => (
  <StyledButton bg="blue.500" color="white" py="2" px="4" rounded="md">
    Button
  </StyledButton>
)11.Patterns
利用頻度が高いCSSはパターンとしてデフォルトで用意されています。
以下はボックス内のテキストをcenter()を使用して中央揃えにしている例です。
import { center } from "../../styled-system/patterns";

export default function Home() {
  return (
    <div
      className={center({
        bg: "gray",
        width: "100px",
        height: "100px",
      })}
    >
      テスト
    </div>
  );
}- container:最大幅のコンテナを作成し、コンテンツを中央に配置する
- stack:要素の垂直または水平スタックを作成するために使用
- hstack:方向プロパティを水平に設定し、要素を垂直方向に中央揃え
- vstack:方向プロパティを垂直に設定し、要素を水平方向に中央揃えにする
- wrap:要素間にスペースを追加するために使用され、十分なスペースがない場合は自動的に折り返し
- aspectRatio:アスペクト比パターンは、固定アスペクト比のコンテナを作成
- flex:flex コンテナーを作成
- center:コンテナーのコンテンツを中央に配置する
- float:要素をコンテナーの上部、下部、左側、または右側に固定する
- grid:グリッド レイアウトを作成する
- gridItem:グリッド コンテナーの子要素のスタイルを設定する
- divider:水平または垂直の区切り線を作成
- circle:円を作成する
- square:幅と高さが等しい正方形を作成
12.Recipes
ボタンなどのパーツのスタイルを共通化したいときなどに、Recipes という形でスタイル定義できます。
書くことができます。
以下の例は、2パターンのボタンのスタイルを持っています。
import { cva } from '../styled-system/css';

export const button = cva({
  base: {
    display: "flex",
  },
  variants: {
    color: {
      red: { bg: "#ff000", color: "#fffff" },
      blue: { bg: "#ccccc", color: "#00000" },
    },
    size: {
      lg: { fontSize: "28px", padding: "8" },
      sm: { fontSize: "16px", padding: "4" },
    },
  },
});
import { button } from "./button.css";
const Button = () => {
return (
<button className={button({ color: "red", size: "sm" })}>ボタン</button>
<button className={button({ color: "blue", size: "lg" })}>ボタン</button>
)
}13.JSX Style Props
stye-props を使用することで、 JSX のプロパティとしてUI を作成することができます。
panda.config.tsexport default defineConfig({
jsxFramework: 'react' // 追加
})以下のようにプロパティを props で指定することができます。
import { styled } from "../../styled-system/jsx";

export default function Home() {
  return (
    <styled.a
      href="https://example.com"
      color="blue"
      width="40"
      textAlign="center"
      display="block"
      background="#ccc"
      padding="4"
    >
      Link
    </styled.a>
  );
}
Panda CSSのメリット・デメリット
メリット
- クラス命名が不要で開発効率が高い
- 型安全で補完が効くため開発効率が向上。
- 軽量かつ効率的なCSS生成が可能。
- グローバルスタイルや条件付きスタイルが簡単に記述できる。
デメリット
- 書き方が多様なため、チーム内でのルール決めが必要になりそう
まとめ
Panda CSSは、開発効率とパフォーマンスを両立可能なフレームワークだと思いました。 一方で、柔軟性が高いため、チームでの運用にはルールを決める必要などはありそうです。
この記事がPanda CSS導入の参考になれば幸いです!